How To Make A Log Splitter With A Hydraulic Jack
Imagine this: making your own log splitter at home is simple and light on the budget, costing only a fraction of what you’d spend at a store. It saves money and turns the work of splitting wood into a piece of cake!
We have curated a simple step-by-step guide to building an at-home log splitter using a hydraulic jack. A DIY that is easy, efficient and pocket-friendly? A win, win, win if you ask us.
You can make a log splitter at home using a hydraulic press and some very basic materials and tools. All you need is a metal frame with a sliding block, a sharp wedge to cut through the wood and a hydraulic jack to do the work for you.
Contents
What You Will Need
You will need the following materials to build your log splitter using a hydraulic jack:
- Hydraulic jack
- Bungee cord
- Steel beams
- Steel bracket clamps
- Sheet metal
- Acetylene torch
- Single-blade wedge
- Castor wheels
- Drill/driver socket drive adapter
- Welding mask
- Protective gloves
If you do not have a welding mask, you should wear protective goggles. It is essential to follow the proper safety precautions, especially when using the acetylene torch. Since acetylene is very unstable, changes in pressure or temperatures pose a potential fire hazard.
Instead of steel beams for your frame, you can use a clothing display frame with holes in it. The good thing about using the clothing display beam is the already-made holes that work great for making adjustments.
A word of advice: since this is a DIY project using scrap metal, used parts can be a great way to reduce the building cost. However, if you are planning on recycling any materials, make sure they pass the quality check.
Step-By-Step Instructions
Now that you have all the essential materials and tools needed to build your very own log splitter, let us get to the step-by-step instructions for this easy DIY project.
Step 1: Main Frame Assembly
Now for the mainframe, you can either go for a vertical design or a horizontal design. We will discuss how to assemble both; however, we recommend using the vertical frame as it is much easier to use. A vertical design allows the splitter top to be near your abdomen, making it much easier to operate.
If you plan to go for a vertical design, then you need to build a support base and an L-shaped mainframe. Ensure the base is stable enough to support the mainframe when you push the wood logs upwards to chop them.
To ensure the frame is stable enough, use the L-shaped design with a rectangular base at the rear for added support.
You can also add another beam at the rear end (especially if you are using a clothing display beam) and weld it using smaller pieces of steel beams so that when the wedge cuts through the wood, the frame is not at risk of bending.
The following video demonstrates how you can use a vertical frame log splitter to split wood.
For the horizontal design, a sawhorse shape with four legs provides excellent stability.
The measurement of the mainframe depends on the size of the wood logs; therefore, it is subjective to how powerful your hydraulic jack is and what size wood logs you want to chop with it.
Once you have decided on the frame style and are happy with the measurements, weld all the pieces together using the acetylene torch.
Step 2: Set Up The Sliding Block
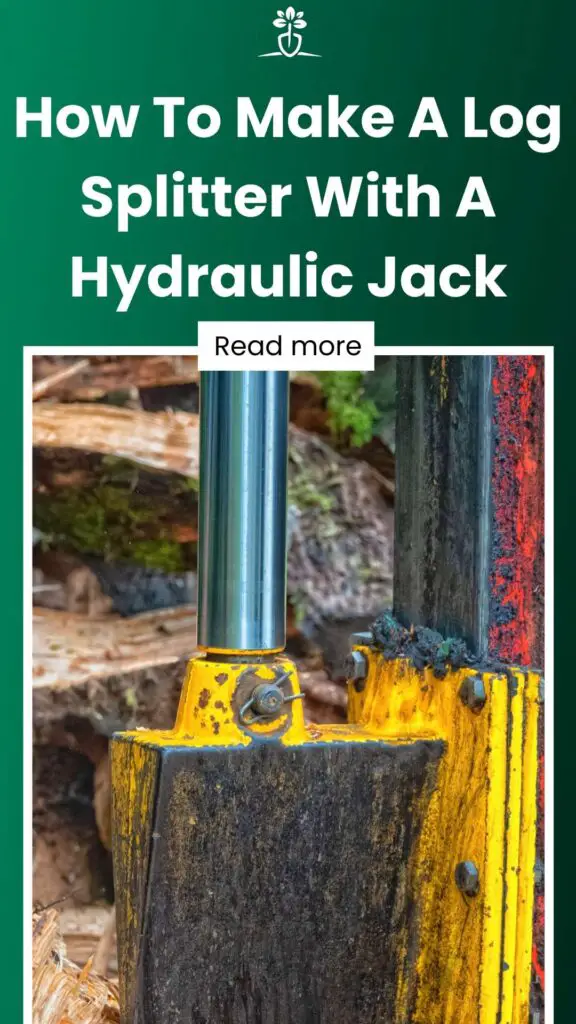
The sliding block is a crucial component of the log splitter for a few reasons: it allows the wood to move smoothly onto the wedge when pushed by the hydraulic jack, the wood piece rests against the block, and it secures your log into place.
When pushing it into the wedge to split it, the jack will move the log against the sliding block. Thus, the sliding block needs to glide on the frame of the log splitter.
Depending on whether you have selected a vertical or horizontal frame design for your log splitter, the placement of the block will vary.
For the vertical frame design, the sliding block sits on top of the pump. To make the sliding block, weld two pieces of hollow metallic cubes – one that sits on top of the jack where the wood log will sit and the other connected piece to glide along with the frame for smooth movement.
For the horizontal frame design, the sliding block will be right under the hydraulic bottle jack and allow horizontal movement of the wooden log.
The same welded design of the sliding block can work for both. However, there are no specific measurements to follow. It all depends on the size of the wooden logs you are looking to split.
An excellent tip is to use additional shims to perfect the gliding motion of the block. For a painted frame, you might have to scrape it a little to make the block fit better.
Once you are satisfied with the sliding motion of the block, you can start with the next step.
Step 3: Mount The Hydraulic Jack
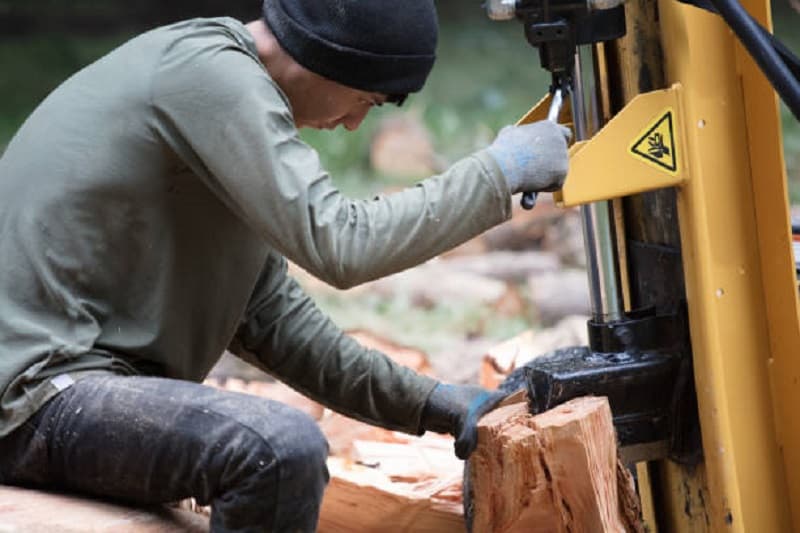
The hydraulic jack powers this DIY log splitter; thus, it is the most crucial part of making this machine work.
For the vertical frame design, the hydraulic jack will rest under the sliding block, and for the horizontal frame design, the jack will rest on top of the sliding block. You have to place the jack on one end of the frame.
Here is an excellent video if you are opting for a horizontal frame design.
We recommend using a bottle jack instead of a floor jack for both frame designs.
It is essential to secure the jack to avoid it from wobbling when the wood is being pushed onto the wedge. You can do so by putting a collar around the neck and welding it into the frame so that it remains secure and does not move.
You can use a simple bungee cord to guide the pedal and restrict its wobbling. The bungee cord will help the pedal return to its original upper position after the wooden log has been pushed.
Step 4: Weld InThe Wedge
Now that the hydraulic jack is secured in place, we move on to weld the wedge on the other end of the frame facing the jack. This is where the wooden log will be pushed and split by the bottle jack.
The wedge could be single-blade or you can recycle an old ax head. If you are pressed for choice, you can also fashion a wedge of your own using sharpened metal.
Use the acetylene torch to weld the wedge to the frame securely.
Hydraulic jacks operate manually; therefore, it is essential to use a sharp wedge that will allow swift splitting of wood. This ensures you are not using unnecessary force when you do not need to and the machine is doing the work for you.
Step 5: Attach Castor Wheels (Optional)
Attaching wheels to your log splitter is optional. However, for added mobility, we would recommend you to take the time to follow through with this step.
You can easily attach castor wheels to your log splitter by screwing them into your frame. Use wheels with a locking mechanism so that once you have moved your log splitter in place, it does not move from there.
Use a marker to mark where you will be drilling the holes for the wheels. Then place the wheel metal housing with holes on top and screw it using a drill or a driver.
We recommend using the ARES 70000 – 3-Inch Impact Grade Socket Adapter Set, which turns your drill driver into a socket drive, making work easier for you.
Here is a simple video of how you can attach locking swivel castor wheels to any frame.
And there you have it. Your very own DIY log splitter is ready to use.
Step 6: Test The Functionality Of The Log Splitter
Now, all that is left to do is testing the functionality of the log splitter. Many people skip this step and get into heavy-duty splitting right away. This can cause your log splitter to become damaged beyond repair.
We recommend testing out softwood tree logs first to see if everything is working smoothly. Once you can ensure the safe working of the splitter, you can move onto the hardwood.
However, keep in mind that the kind of wood you can split will solely depend upon the lifting capacity of the hydraulic jack and the size of your sliding block.
Also, make sure that if you are splitting bigger wooden blocks then the frame has been strengthened so that it does bend under pressure.
For the wedge, notice if it’s slicing through the wood as efficiently as you would like. If that is not the case, then you can sharpen the wedge.
Another thing that might interfere with the wedge’s function is the angle of the wedge. Make sure the blade comes in head-on contact with the log as it is pushed towards it. Fix the angle if needed and test the log splitter again.
Once you are happy with all the checks, you can safely use your log splitter to slice wood.
Also See: The Best Electric Log Splitters
Conclusion
The log splitter can help you split wood much more efficiently than doing it manually with an ax.
As mentioned above, you can easily build one at home using a hydraulic jack. Thus, this DIY does not only make log splitting easy for you, but it also saves you money.